360 degree photos from Lego, a PICAXE, C# and JavaScript
Friday, 9th July 2010
As you may have guessed from the ratio of photos to actual content in my entries I do quite enjoy taking photos of things. One of the reasons I enjoy working with electronics over writing software for computers is that a finished product results in something physical, which I find much more rewarding than a purely virtual hobby.
One type of photograph I particularly enjoy on other websites is the interactive 360° view of a product. The ability to click and drag to rotate an object on the screen makes it seem more real.
What do you need to take this sort of photograph and show it on a web page? There are four components I could think of:
- A rotating platform that could be controlled to rotate to a specific angle.
- A fixed camera that can be triggered once the platform has advanced to the correct angle.
- A way to combine all of the photos taken at different angles into a single file.
- An piece of code that would allow the user to rotate the object on-screen and display the correct single view of the object.
My final solution is a bit of a Heath Robinson affair but it seems to work quite well!
The rotating platform
The most obvious way to build such a platform is to use a stepper motor, as that is specifically designed to be positioned to a particular angle. The problem is that I don't have any stepper motors, and even if I did it would be quite tricky to connect one to a platform. A more practical alternative is to use something I do have — Lego Technic.
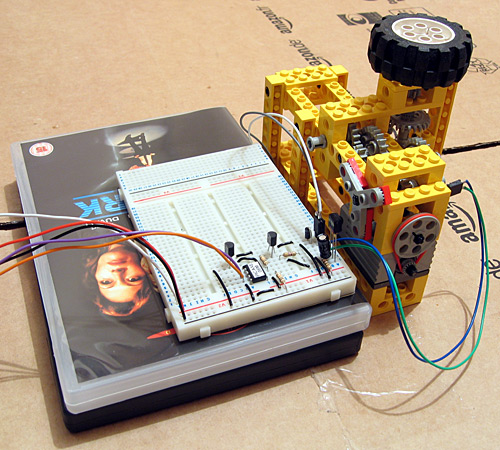
A Lego motor cannot be set to rotate to a particular position, so some additional electronics are required. The motor drives a worm gear which in turn rotates a three-bladed propeller relatively slowly (shown with red pieces attached to it in the photo). This propeller cuts the path of a beam of infra-red light between an LED and an infra-red receiver module. A microcontroller (in this case, a PICAXE-08M) is used to advance the platform in steps by switching the motor on, waiting for the beam to be unblocked, waiting for the beam to be blocked again then switching the motor off. The gears I am using have twenty-four or eight teeth, so each pair of gears divides the rotational speed by 24/8=3. I am using four pairs of gears which results in a division of 34=81. The propeller has three blades which further divides the rotational speed by three resulting in the ability to set the platform to 81×3=243 distinct angles.
' This code is for a PICAXE-08M
#PICAXE 08M

' This pin is used to generate the 38kHz IR carrier. It should be connected to the IR LED's cathode (-).
Symbol IRPwmPin = 2
' This pin is connected to the IR demodulator's output.
Symbol IRReceiverPin = Pin3

' This pin is connected to the motor enable output.
Symbol MotorPin = 4

Symbol SerialControlIn = 1

' The desired position of the "stepper" motor.
Symbol StepDesired = B8
' The current position of the "stepper" motor.
Symbol StepCurrent = B9

Symbol StepDesiredConfirm = B10
Symbol StepDesiredPotential = B11

' Returned from the CheckBeam routine.
Symbol BeamBlocked = B12

' Rather than spin once at a time (slow) spin up to this many times between exchanging position information with the computer.
Symbol SpinLoopCount = 3

' Stores the spin loop time.
Symbol SpinLoop = B13

' The number of steps in a complete revolution.
Symbol TotalSteps = 243


Main:

    ' Reset the current and desired steps.
    StepDesired = 0
    StepCurrent = 0

    ' Switch the motor off.
    Low MotorPin

    'StepDesiredConfirmCount = 0

    Do
        ' Fetch the desired position.
        SetFreq M8
        SerIn SerialControlIn, N4800_8, (CR, LF), #StepDesiredPotential, #StepDesiredConfirm
        SetFreq M4

        ' Check the received data - the second value should be the logical inversion of the first.
        StepDesiredConfirm = Not StepDesiredConfirm
        If StepDesiredPotential = StepDesiredConfirm Then
            StepDesired = StepDesiredPotential
        End If


        ' Adjust the position if required.
        For SpinLoop = 1 To SpinLoopCount

            ' Broadcast the current step position.
            SerTxd(#StepCurrent, ",", #StepDesired, CR, LF)

            ' Do we need to run the motor?
            If StepCurrent <> StepDesired Then

                ' Switch the motor on.
                High MotorPin
                Pause 20

                ' Wait for the beam to be unblocked.
                Do GoSub CheckBeam
                Loop Until BeamBlocked = 0


                Pause 20

                ' Wait for the beam to become blocked again.
                Do GoSub CheckBeam
                Loop Until BeamBlocked = 1

                ' Switch the motor off.
                Low MotorPin

                ' Increment step current to indicate a change of step.
                Inc StepCurrent
                If StepCurrent = TotalSteps Then
                    StepCurrent = 0
                End If
            End If


        Next SpinLoop

    Loop

' Checks whether the beam is blocked or not.
' Returns BeamBlocked = 0 for an unblocked beam, BeamBlocked for a blocked beam.
CheckBeam:
    PwmOut IRPwmPin, 25, 53 ' 38kHz, calculated via PICAXE->Wizards->pwmout
    Pause 1
    BeamBlocked = IRReceiverPin
    PwmOut IRPwmPin, Off
    Return
The BASIC program on the PICAXE constantly outputs the current position and desired position via the serial programming cable as ASCII in the format <current>,<desired><CR><LF>. It also checks for the desired position every loop on via a serial input pin (sadly not the one used for programming the PICAXE as that is not permitted on the 08M) in the format <CR><LF><desired>,<~desired>. (again in ASCII). The desired position is transmitted twice, once normally and the second time inverted (all zero bits set to one and all one bits set to zero) as a simple form of error detection; should the second value received not be a logical inversion of the first then the value is discarded.
A copy of the schematic can be downloaded by clicking the above thumbnail. It is pretty simple; serial data is input on pin IN1 (move the serial input from the programming cable from SERIAL_IN to IN1), an IR LED is driven from pin PWM2 via a current-limiting resistor, an IR receiver sends its input to pin IN3, a Darlington pair drives the motor via pin OUT4 and information is sent out via the SERIAL_OUT pin (no need to move the programming cable for that one).
Triggering the camera
My camera does not have a standard remote control, but does has some software that allows you to capture shots when it's connected to your USB port. Unfortunately the Canon PowerShot SDK is rather old and is no longer maintained, which means that any software that uses it is bound to its bugs and limitations. One of its bigger problems is that it doesn't work on Vista; by setting the Remote Capture utility into XP compatibility mode I could set up a shot and see a live viewfinder but attempting to release the shutter caused the app to hang for about a minute before claiming the camera had been disconnected.
Fortunately VirtualBox emulates USB and serial ports so I set up Windows XP in a virtual machine and installed the Remote Capture utility. It still doesn't work very well (taking about thirty seconds between releasing the shutter and transferring the image) but it's better than nothing.
To control platform I use the following C# code. It's very poorly written (you need to make sure that you quickly set the Remote Capture application as the foreground window when you start it, for example, and it has a hard-coded 10 second delay after taking the photo to transfer the photo from the camera to the PC — when my camera's batteries started going flat it started to drop frames).
using System;
using System.Globalization;
using System.IO.Ports;
using System.Text;
using System.Text.RegularExpressions;
using System.Threading;
using System.Windows.Forms;
using System.Diagnostics;
using System.Linq;

class Program {

    const int StepsInRevolution = 243;

    enum ApplicationState {
        AligningStepper,
        WaitingStepperAligned,
        WaitingStartPistol,
        Photographing,
        Exiting,
    }

    static void Main(string[] args) {
        StringBuilder receivedData = new StringBuilder();
        using (var serialPort = new SerialPort("COM1", 4800, Parity.None, 8, StopBits.Two)) {
            serialPort.WriteTimeout = 1;

            serialPort.Open();

            var packetFieldsRegex = new Regex(@"^(\d+),(\d+)$");

            int? currentPosition = null;
            int desiredPosition = 0;
            int? confirmedDesiredPosition = null;
            int startPosition = 0;

            int angleCount = 64;
            int currentAngle = 0;

            serialPort.DataReceived += new SerialDataReceivedEventHandler((sender, e) => {
                if (e.EventType == SerialData.Chars) {
                    receivedData.Append(serialPort.ReadExisting());
                    string receivedDataString;
                    int newLinePosition;
                    while ((newLinePosition = (receivedDataString = receivedData.ToString()).IndexOf("\r\n")) != -1) {
                        var packet = receivedDataString.Substring(0, newLinePosition);
                        receivedData = receivedData.Remove(0, packet.Length + 2);
                        var packetFields = packetFieldsRegex.Matches(packet);
                        if (packetFields.Count == 1) {
                            currentPosition = int.Parse(packetFields[0].Groups[1].Value, CultureInfo.InvariantCulture);
                            confirmedDesiredPosition = int.Parse(packetFields[0].Groups[2].Value, CultureInfo.InvariantCulture);
                        }
                    }
                }
            });

            ApplicationState appState = ApplicationState.AligningStepper;

            // Main loop.
            while (appState != ApplicationState.Exiting) {
                // Update the stepper position.
                try {
                    serialPort.Write(string.Format(CultureInfo.InvariantCulture, "\r\n{0},{1}.", desiredPosition, (byte)~desiredPosition));
                } catch (TimeoutException) {
                    serialPort.DiscardOutBuffer();
                }
                Thread.Sleep(10);
                // What are we doing?
                switch (appState) {
                    case ApplicationState.AligningStepper:
                        if (currentPosition.HasValue) {
                            desiredPosition = (currentPosition.Value + 5) % StepsInRevolution;
                            appState = ApplicationState.WaitingStepperAligned;
                        }
                        break;
                    case ApplicationState.WaitingStepperAligned:
                        if (currentPosition.Value == desiredPosition) {
                            startPosition = desiredPosition;
                            appState = ApplicationState.WaitingStartPistol;
                            //while (Console.KeyAvailable) Console.ReadKey(true);
                            //Console.WriteLine("Press any key to start rotating...");
                        }
                        break;
                    case ApplicationState.WaitingStartPistol:
                        //while (Console.KeyAvailable) {
                        //  Console.ReadKey(true);
                            appState = ApplicationState.Photographing;
                        //}
                        break;
                    case ApplicationState.Photographing:
                        if (currentPosition == desiredPosition) {
                            Console.Write("Taking photo {0} of {1}...", currentAngle + 1, angleCount);
                            SendKeys.SendWait(" ");
                            Thread.Sleep(10000);
                            Console.WriteLine("Done!");
                            if (currentAngle++ == angleCount) {
                                appState = ApplicationState.Exiting;
                            } else {
                                desiredPosition = (startPosition + (currentAngle * StepsInRevolution) / angleCount) % StepsInRevolution;
                            }
                        }
                        break;
                }
            }

            Console.WriteLine("Done.");
            Console.ReadKey(true);
        }
    }
}
It was meant to prompt to press a key before starting to allow you to re-align the object to the starting position (if required) but this would switch focus away from the Remote Capture utility. I'll probably fix this to switch the focus explicitly to the Remote Capture utility before sending the key to trigger a capture, and will also add code that polls the photo destination directory to spot when the file has been downloaded from the camera instead of the hard-coded 10 second delay. Working in the virtual machine and with the buggy Remote Capture utility is a frustrating endeavour so I left it as it is for the time being!
Stitching the photos together
Once the photos had been taken they needed to be stitched together into a single file. I decided to use 64 angles for a complete revolution as this seemed a good trade-off between fine control over rotation and a decent file size. It also allowed the images to be arranged into a neat 8×8 grid.
I first used VirtualDub to crop each image. VirtualDub allows you to open an image sequence and export to an image sequence so it seemed ideal for the task. Once I had the object neatly cropped I stitched all of them together into a large single PNG file using the following C# program:
using System;
using System.Drawing;
using System.IO;
using System.Text.RegularExpressions;

class Program {
    static void Main(string[] args) {
        var middleImage = 14; // Index of the "middle" (default angle) image.
        var nameRegex = new Regex(@"Processed(\d{2})");
        var images = new Bitmap[64];
        try {
            foreach (var file in Directory.GetFiles(@"D:\Documents\Pictures\Digital Photos\Projects\Line Blanker\Insides 360\Processed", "*.png")) {
                var matches = nameRegex.Matches(file);
                if (matches.Count == 1) {
                    images[int.Parse(matches[0].Groups[1].Value)] = new Bitmap(file);
                }
            }
            var maxSize = new Size(0, 0);
            for (int i = 0; i < images.Length; i++) {
                if (images[i] == null) {
                    Console.WriteLine("Image {0} missing!", i);
                } else {
                    maxSize = new Size(Math.Max(images[i].Width, maxSize.Width), Math.Max(images[i].Height, maxSize.Height));
                }
            }
            using (var finalImage = new Bitmap(maxSize.Width * 8, maxSize.Height * 8)) {
                using (var g = Graphics.FromImage(finalImage)) {
                    g.PixelOffsetMode = System.Drawing.Drawing2D.PixelOffsetMode.Half;
                    for (int x = 0; x < 8; ++x) {
                        for (int y = 0; y < 8; ++y) {
                            var image = images[(x + y * 8 + middleImage) % images.Length];
                            if (image != null) {
                                g.DrawImage(image, new Point(x * maxSize.Width + (maxSize.Width - image.Width) / 2, y * maxSize.Height + (maxSize.Height - image.Height) / 2));
                            }
                        }
                    }
                }
                finalImage.Save("out.png");
            }
        } finally {
            for (int i = 0; i < images.Length; i++) {
                if (images[i] != null) {
                    images[i].Dispose();
                    images[i] = null;
                }
            }
        }
    }
}
The program requires that the input images are named Processed00.png to Processed63.png, which is easily arranged when exporting an image sequence from VirtualDub. The resulting image can be tidied up in a conventional image editor.
Embedding the result on a web page
The final bit of code required is to allow the 360° image to be embedded and manipulated on a web page. I opted to use JavaScript for this task as it seemed the lightest and simplest way to work.
if (typeof(Rotate360) == 'undefined') {
    var Rotate360 = new Class({
        Implements : [Options, Events],
        options : {
            width : 320,
            height : 240,
            container : null,
            element : null
        },
        sign : function(v) {
            return (v > 0) ? +1 : (v < 0 ? -1 : 0);
        },
        initialize : function(source, options) {
            this.setOptions(options);
            this.source = source;
            var rotate360 = this;
            this.element = new Element('div', {
                'class' : 'rotate360',
                styles : {
                    width : this.options.width + 'px',
                    height : this.options.height + 'px',
                    background : 'transparent no-repeat url("' + this.source + '") scroll 0 0'
                },
                events : {
                    mouseenter : function(e) {
                        if (typeof(rotate360.mouseHandlerDiv) != 'undefined') {
                            var myPosition = rotate360.element.getCoordinates();
                            rotate360.mouseHandlerDiv.setStyles({
                                left : myPosition.left + 'px',
                                top : myPosition.top + 'px',
                                width : myPosition.width + 'px',
                                height : myPosition.height + 'px'
                            });
                        }
                    }
                }
            });
            this.mouseHandlerDiv = new Element('div', {
                styles : {
                    position : 'absolute',
                    cursor : 'e-resize'
                },
                events : {
                    mousemove : function(e) {
                        if (typeof(rotate360.mouseHeld) != 'undefined' && rotate360.mouseHeld && typeof(rotate360.previousPageX) != 'undefined' && typeof(rotate360.previousPageY) != 'undefined') {
                            var currentBackgroundPosition = rotate360.element.getStyle('background-position').split(' ');
                            currentBackgroundPosition[0] = parseInt(currentBackgroundPosition[0]);
                            currentBackgroundPosition[1] = parseInt(currentBackgroundPosition[1]);
                            if (typeof(rotate360.rotateX) == 'undefined') rotate360.rotateX = 0;
                            rotate360.rotateX += (e.page.x - rotate360.previousPageX) / (360 * (rotate360.options.width / 270) / ((rotate360.image.width * rotate360.image.height) / (rotate360.options.width * rotate360.options.height)));
                            var workingAngle = parseInt(rotate360.rotateX);
                            currentBackgroundPosition[0] = -rotate360.options.width * (workingAngle % (rotate360.image.width / rotate360.options.width));
                            currentBackgroundPosition[1] = -rotate360.options.height * Math.floor(workingAngle / (rotate360.image.height / rotate360.options.height));
                            while (currentBackgroundPosition[0] > 0) currentBackgroundPosition[0] -= rotate360.image.width;
                            while (currentBackgroundPosition[0] <= -rotate360.image.width) currentBackgroundPosition[0] += rotate360.image.width;
                            while (currentBackgroundPosition[1] > 0) currentBackgroundPosition[1] -= rotate360.image.height;
                            while (currentBackgroundPosition[1] <= -rotate360.image.height) currentBackgroundPosition[1] += rotate360.image.height;
                            rotate360.element.setStyle('background-position', currentBackgroundPosition[0] + 'px ' + currentBackgroundPosition[1] + 'px');
                            rotate360.previousPageX = e.page.x;
                            rotate360.previousPageY = e.page.y;
                        } else {
                            rotate360.previousPageX = e.page.x;
                            rotate360.previousPageY = e.page.y;
                        }
                    },
                    mousedown : function(e) {
                        e.stop();
                        rotate360.mouseHeld = true;
                        rotate360.mouseHandlerDiv.setStyles({
                            left : 0,
                            width : '100%'
                        });
                    },
                    mouseup : function(e) {
                        e.stop();
                        rotate360.mouseHeld = false;
                        rotate360.element.fireEvent('mouseenter');
                    }
                }
            }).inject(document.body, 'top');
            this.image = new Asset.image(this.source, {
                onload : function() {
                    if (rotate360.options.element) {
                        rotate360.element.replaces(rotate360.options.element);
                    } else if (rotate360.options.container) {
                        rotate360.options.container.adopt(rotate360.element);
                    }
                }
            });
        }
    });
    window.addEvent('domready', function() {
        $$('img.rotate360').each(function(rotate360) {
            var src = rotate360.src.replace(/\.([a-zA-Z]+)$/, '_360.$1');
            var img = new Asset.image(src, {
                onload : function() {
                    new Rotate360(img.src, {
                        width : rotate360.width,
                        height : rotate360.height,
                        element : rotate360
                    });
                }
            });
        });
    });
}
The above code requires MooTools (both "core" and "more" for its Asset classes). It can be invoked manually or (preferably) will replace any image with a class of rotate360 with the 360° version — if the file was example.jpg the 360° version would be example_360.jpg.
Examples
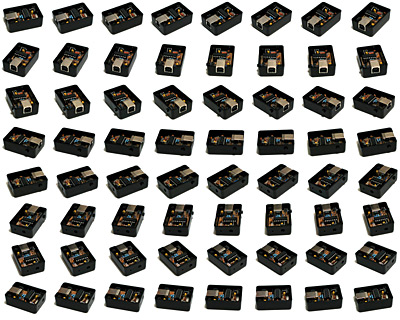
I've taken photos of a few of my previous projects using this technique — USB remote control, AVR TV game and VGA line blanker. The process could use some refinement but it certainly seems to work!