Adding sprite objects to the 3D world
Tuesday, 2nd November 2010
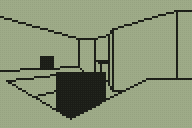
The previous entry showed a room from a map copied from DOOM's E2M7. I have since added the adjacent room:
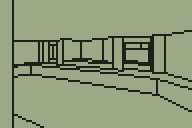
It may not look as interesting as the other room but it is significantly more costly to render due to the sheer number of lines visible at a time in it. Looking across it from the far corner dropped performance down to around 2 FPS on the 6MHz TI-83+, which was really not a very good effort. I spent a fair amount of time over the weekend trying to optimise the code as much as I could, and manage to bring the frame rate in the player's starting position from 6 FPS up to the target 10 FPS. Looking across the length of the new room still dropped the framerate to around 4 FPS at 6MHz, but it's a start.
Once the engine had been made a little faster it seemed a good idea to slow it back down again by adding a feature. I had been pondering how to add objects in the form of scaled sprites to the world. Working out where to put them on the screen isn't so difficult, but clipping them against the world geometry so that they couldn't be seen through walls is another matter entirely. One way that seemed popular is to draw the objects in reverse depth order (drawing the sprites that were further away before those that were closer) and using a depth buffer for the world geometry to clip each pixel of the sprite against the world. This would take up a lot of memory on the calculator and run very slowly (populating the buffer with a depth value for each pixel would be a very expensive operation, as you'd have to interpolate depth values between the ends of walls and edges of floors).
The engine makes use of three per-column clipping tables when rendering the scene. One keeps track of columns that have been completed (usually by drawing a "middle" wall to that column); once completed no more pixels may be drawn to that column. The other two tables are used to define the upper and lower clipping bounds. At the start of the scene these are reset to the top and bottom edges of the display. As the world is rendered from front-to-back these regions are reduced to clip geometry that is further away against geometry that is nearer (think of looking through a hole in a wall — things that are further away from you will never be drawn in the space above or below that hole).
Fortunately, you can use this clipping information to clip sprites against the world geometry too. Each sprite object needs to be associated with a convex subsector. These subsectors are made up of walls and are drawn from front-to-back (sorted by the BSP tree) as the world is rendered. Before each one of these subsectors is drawn it is checked to see if it contains any sprite objects — if it does, the current clipping buffers and a reference to the subsector are pushed onto a stack. When all of the walls and floors have been drawn this stack contains a list of all of the subsectors containing sprites and the clipping regions used to draw those subsectors in front-to-back order. Stacks are Last In, First Out structures and so when you pull the data back out of this stack you end up retrieving a list of sprites to draw and the associated clipping regions in back-to-front order. This allows you to effectively unwind the clipping operations, so as you draw the sprites from back-to-front you can gradually enlarge the clipping regions in the opposite order to the way that they were reduced when drawing the walls. You would still need to sort the sprites manually from back-to-front within each subsector, but for the time being I've limited myself to one sprite per subsector for ease of development.
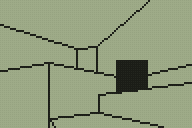
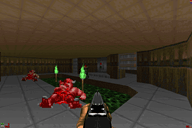
The above screenshots demonstrate an initial test of the "things" (as they are apparently technically called), rendering them as solid black squares.
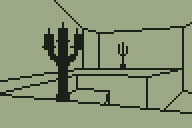
Scaled sprites tend to be more useful than solid black squares, however, so here are a pair of candlesticks (well, that was the intention at any rate; call them cacti if you must). The sprite was simply ORed to the display, so pixels could be black or transparent.

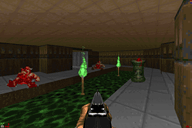
I then added support for "white" pixels too. The above screenshot is a link to an animated GIF showing the engine in action. The sprites appear to jiggle up and down and have invalid data drawn underneath them in places, which was caused by my accidentally overwriting an important register before rendering each column (fortunately an easy one to spot)! The relatively high frame rate in the above image was helped by running at 15MHz and using the old single-room map.
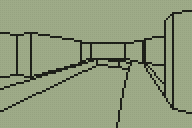
The above screenshot (click for the animated GIF) fixes the dancing sprites and restores the second room, though is still running at 15MHz. For a bit of fun I added animated doors; all this does is adjust the floor heights of the sectors used to represent "doors" (pressing Alpha will toggle both doors open or shut) but it makes the world look a little more dynamic.
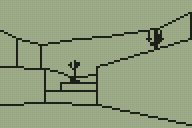
There are still some rendering bugs in the engine. The above animated screenshot demonstrates one; when close to a wall edge you will sometimes see a temporary vertical line the height of the screen or the screen will flash white. I reckon this is probably an integer overflow issue causing the projected height of a line to be on the opposite side of the screen than the one it should be (the bottom edge of a hole in a wall may be projected above the screen rather than below it, causing the entire screen to be clipped out, for example). One bug that took a while to identify (it only appeared in very particular positions; moving one unit in any direction cured it) was caused by truncating a 32-bit integer to a 24-bit one. When viewing a long wall from a long distance the result of a 16-bit (difference between end and start X coordinates) by 16-bit (Y coordinate of the start of the wall) multiplication was resulting in a value of $00800000 or so (a large positive number). When truncated to 24 bits this becomes $800000, which has the most-significant bit set and was therefore treated as a large negative number. As this was part of the wall clipping code it would end up clipping a wall end a long way behind the camera instead of within the view; fortunately this obvious mistake is easy to spot and correct (the answer can only be positive, so if you get a negative one just negate it).
If you'd like to try the demo on your own calculator please download Nostromo.zip. As this is a work in progress there are likely to be bugs so please back up any important files first!