SaveStates and Key Names
Monday, 31st March 2008
It's a good feeling when issue 1 is finally marked as Fixed - in this case it was another interrupt-related bug. The IFF1 flag was being used to mask non-maskable interrupts; I don't think it should and it hasn't seem to have broken anything just yet by making non-maskable interrupts truly non-maskable.
I have also changed the savestate format to something that will be a little more backwards compatible rather than a plain BinaryFormatter dump of the entire emulator state. The data is now saved in what is basically an INI file with C#-style attributes and CSS-style url() syntax for binary data.
[Type(BeeDevelopment.Sega8Bit.Hardware.VideoDisplayProcessor)]
VideoRam=Dump(Video\VideoRam.bin)
Address=49165
WaitingForSecond=False
AccessMode=ColourRamWrite
ReadBuffer=32
Registers=Dump(Video\Registers.bin)
System=Ntsc
SupportsMode4=True
; ... snip ...
Other changes include a faked fullscreen mode (ie, a maximised borderless window) and an option to retain the aspect ratio of the game, so games no longer appear stretched on widescreen monitors. The sound emulation is a bit better, but still a little noisy in certain games with spurious beeps or buzzes.
One minor problem was on the key configuration control panel. Converting members of the Keys enumeration into displayable strings can be done via .ToString(), but this results in names that do not match the user's keyboard layout (such as OemQuestion for /, OemTilde for # and even Oemcomma for , - note the lowercase c, all on a UK keyboard).
With a prod in the right direction from jpetrie, here's a snippet that can be used to convert Keys into friendly key name strings:
#region Converting Keys into human-readable strings.

/// <summary>
/// Converts a <see cref="Keys"/> value into a human-readable string describing the key.
/// </summary>
/// <param name="key">The <see cref="Keys"/> to convert.</param>
/// <returns>A human-readable string describing the key.</returns>
public static string GetKeyName(Keys key) {

	// Convert the virtual key code into a scancode (as required by GetKeyNameText).
	int Scancode = MapVirtualKey((int)key, MapVirtualKeyMode.MAPVK_VK_TO_VSC);

	// If that returned 0 (failure) just use the value returned by Keys.ToString().
	if (Scancode == 0) return key.ToString();

	// Certain keys end up being mapped to the number pad by the above function,
	// as their virtual key can be generated by the number pad too.
	// If it's one of the known number-pad duplicates, set the extended bit:
	switch (key) {
		case Keys.Insert:
		case Keys.Delete:
		case Keys.Home:
		case Keys.End:
		case Keys.PageUp:
		case Keys.PageDown:
		case Keys.Left:
		case Keys.Right:
		case Keys.Up:
		case Keys.Down:
		case Keys.NumLock:
			Scancode |= 0x100;
			break;
	}

	// Perform the conversion:
	StringBuilder KeyName = new StringBuilder("".PadRight(32));
	if (GetKeyNameText((Scancode << 16), KeyName, KeyName.Length) != 0) {
		return KeyName.ToString();
	} else {
		return key.ToString();
	}
}

/// <summary>
/// Retrieves a string that represents the name of a key.
/// </summary>
/// <param name="lParam">Specifies the second parameter of the keyboard message (such as <c>WM_KEYDOWN</c>) to be processed.</param>
/// <param name="lpString">Pointer to a buffer that will receive the key name.</param>
/// <param name="size">Specifies the maximum length, in TCHAR, of the key name, including the terminating null character. (This parameter should be equal to the size of the buffer pointed to by the lpString parameter).</param>
/// <returns>The length of the returned string.</returns>
[DllImport("user32.dll")]
static extern int GetKeyNameText(int lParam, StringBuilder lpString, int size);

/// <summary>
/// Translates (maps) a virtual-key code into a scan code or character value, or translates a scan code into a virtual-key code.
/// </summary>
/// <param name="uCode">Specifies the virtual-key code or scan code for a key. How this value is interpreted depends on the value of the <paramref name="uMapType"/> parameter.</param>
/// <param name="uMapType">Specifies the translation to perform. The value of this parameter depends on the value of the <paramref name="uCode"/> parameter.</param>
/// <returns>Either a scan code, a virtual-key code, or a character value, depending on the value of <paramref="uCode"/> and <paramref="uMapType"/>. If there is no translation, the return value is zero.</returns>
[DllImport("user32.dll")]
static extern int MapVirtualKey(int uCode, MapVirtualKeyMode uMapType);

enum MapVirtualKeyMode {
	/// <summary>uCode is a virtual-key code and is translated into a scan code. If it is a virtual-key code that does not distinguish between left- and right-hand keys, the left-hand scan code is returned. If there is no translation, the function returns 0.</summary>
	MAPVK_VK_TO_VSC = 0,
	/// <summary>uCode is a scan code and is translated into a virtual-key code that does not distinguish between left- and right-hand keys. If there is no translation, the function returns 0.</summary>
	MAPVK_VSC_TO_VK = 1,
	/// <summary>uCode is a virtual-key code and is translated into an unshifted character value in the low-order word of the return value. Dead keys (diacritics) are indicated by setting the top bit of the return value. If there is no translation, the function returns 0.</summary>
	MAPVK_VK_TO_CHAR = 2,
	/// <summary>uCode is a scan code and is translated into a virtual-key code that distinguishes between left- and right-hand keys. If there is no translation, the function returns 0.</summary>
	MAPVK_VSC_TO_VK_EX = 3,
	MAPVK_VK_TO_VSC_EX = 4,
}

#endregion
It uses P/Invoke and the Win32 API so is only suitable for use on Windows.

Fun with IThumbnailProvider
Friday, 28th March 2008
Note: I have been informed that the code below no longer works in Windows 7 due to changes in the way IThumbnailProvider operates. It is recommended that you use unmanaged code instead of the managed solution presented below.
I have started releasing Cogwheel binaries on its project page, so if you'd like a look at the project but can't be bothered to check out and build the source yourself you can now give it a whirl.
One of the newer additions is a savestate mechanism; this is a very lazy bit of code on my behalf as all it does currently is serialise the entire emulator to a file using the BinaryFormatter. This resulted in savestates weighing in at about 6MB; by marking certain private fields (such as look-up tables in the Z80 emulator) as [NonSerialized] it was down to 2MB. To squash it down to the current ~250KB size the savestate is compressed using the zip file classes I've written to handle loading ROMs from zips.
Whilst this is going to change soon (I'm currently working this on an simple INI file serialiser, so the savestate files will be compatible with later releases of the software) I decided to experiment with the idea of dumping extra data into the savestate - namely, a screenshot.
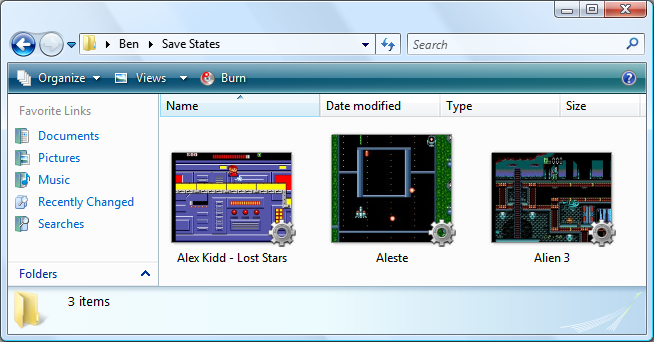
The screenshot is simply saved as Screenshot.png in the root of the savestate's zip archive. Creating a thumbnailer is extremely easy under Vista, and as the thumbnailer runs out-of-process you can use .NET code! Here's a quick and dirty run-down of how to make them if you decide to write one yourself.
Setting up the project
Create a new class library project in Visual Studio, then go switch to its project properties editor. On the Application tab, set Target Framework to something sensible (I currently try and keep everything at .NET 2.0 level), then click on the Assembly Information button and tick the Make assembly COM-Visible box.
Finally, move to the Signing tab, and tick the box marked Sign the assembly. From the drop-down box, pick New, which will create a new key file and add it to the project (this is required later for COM registration).
Add the COM interface wrappers
This is a simple copy and paste job! Just bung this in a source file somewhere:
using System;
using System.Runtime.InteropServices;
using System.Runtime.InteropServices.ComTypes;

namespace Thumbnailer {

	/// <summary>
	/// Defines the format of a bitmap returned by an <see cref="IThumbnailProvider"/>.
	/// </summary>
	public enum WTS_ALPHATYPE {
		/// <summary>
		/// The bitmap is an unknown format. The Shell tries nonetheless to detect whether the image has an alpha channel.
		/// </summary>
		WTSAT_UNKNOWN = 0,
		/// <summary>
		/// The bitmap is an RGB image without alpha. The alpha channel is invalid and the Shell ignores it.
		/// </summary>
		WTSAT_RGB = 1,
		/// <summary>
		/// The bitmap is an ARGB image with a valid alpha channel.
		/// </summary>
		WTSAT_ARGB = 2,
	}

	/// <summary>
	/// Exposes a method for getting a thumbnail image.
	/// </summary>
	[ComVisible(true), Guid("e357fccd-a995-4576-b01f-234630154e96"), InterfaceType(ComInterfaceType.InterfaceIsIUnknown)]
	public interface IThumbnailProvider {
		/// <summary>
		/// Retrieves a thumbnail image and alpha type.
		/// </summary>
		/// <param name="cx">The maximum thumbnail size, in pixels. The Shell draws the returned bitmap at this size or smaller. The returned bitmap should fit into a square of width and height <paramref name="cx"/>, though it does not need to be a square image. The Shell scales the bitmap to render at lower sizes. For example, if the image has a 6:4 aspect ratio, then the returned bitmap should also have a 6:4 aspect ratio.</param>
		/// <param name="hBitmap">When this method returns, contains a pointer to the thumbnail image handle. The image must be a device-independent bitmap (DIB) section and 32 bits per pixel. The Shell scales down the bitmap if its width or height is larger than the size specified by cx. The Shell always respects the aspect ratio and never scales a bitmap larger than its original size.</param>
		/// <param name="bitmapType">Specifies the format of the output bitmap.</param>
		void GetThumbnail(int cx, out IntPtr hBitmap, out WTS_ALPHATYPE bitmapType);
	}

	/// <summary>
	/// Provides a method used to initialize a handler, such as a property handler, thumbnail provider, or preview handler, with a file stream.
	/// </summary>
	[ComVisible(true), Guid("b824b49d-22ac-4161-ac8a-9916e8fa3f7f"), InterfaceType(ComInterfaceType.InterfaceIsIUnknown)]
	public interface IInitializeWithStream {
		/// <summary>
		/// Initializes a handler with a file stream.
		/// </summary>
		/// <param name="stream">Pointer to an <see cref="IStream"/> interface that represents the file stream source.</param>
		/// <param name="grfMode">Indicates the access mode for <paramref name="stream"/>.</param>
		void Initialize(IStream stream, int grfMode);
	}

}
(You may wish to set the namespace to something more appropriate). As you can see, most of that source file is documentation.
Create your thumbnailer class
First thing you'll need to do here is to generate a GUID for your thumbnailer; this is so that when you register your thumbnailer Windows will know which COM object to create an instance of which it can then call to generate a thumbnail (the GUID of your thumbnailer is attached to the extension of the file via standard file associations - more on that later).
Your thumbnailer class should implement two interfaces; IThumbnailProvider (obviously!) and IInitializeWithStream. Here's a skeleton class for the thumbnailer:
using System;
using System.Drawing;
using System.Drawing.Drawing2D;
using System.IO;
using System.Runtime.InteropServices;
using System.Runtime.InteropServices.ComTypes;

namespace Thumbnailer {

	[ComVisible(true), ClassInterface(ClassInterfaceType.None)]
	[ProgId("YourApp.ThumbnailProvider"), Guid("YOUR-GUID-IN-HERE")]
	public class ThumbnailProvider : IThumbnailProvider, IInitializeWithStream {

		#region IInitializeWithStream

		private IStream BaseStream { get; set; }

		public void Initialize(IStream stream, int grfMode) {
			this.BaseStream = stream;
		}

		#endregion

		#region IThumbnailProvider

		public void GetThumbnail(int cx, out IntPtr hBitmap, out WTS_ALPHATYPE bitmapType) {

			hBitmap = IntPtr.Zero;
			bitmapType = WTS_ALPHATYPE.WTSAT_UNKNOWN;

			try {

				// Thumbnailer code in here...

			} catch { } // A dirty cop-out.

		}

		#endregion
	}
}
You will probably want to set the ProgId to something meaningful, and make sure you set the GUID to the one you just generated.
What will happen is that Windows will first initialise your object by calling IInitializeWithStream.Initialize(), passing in an IStream. The above implementation stores the IStream in a member property for future reference.
Windows will then call IThumbnailProvider.GetThumbnail(). cx is the maximum size of the thumbnail (width and height) you should return; Windows will scale your thumbnail down if you return one that is too large. Do not scale your thumbnail up to match this value; it is perfectly valid to return one that is smaller than the requested value. Also; do not scale your thumbnail up to a square: you should return it at the same aspect ratio of the source image.
For the moment, and for the sake of testing, here's a snippet that will create a bright red thumbnail using GDI+:
using (var Thumbnail = new Bitmap(cx, cx)) {
	using (var G = Graphics.FromImage(Thumbnail)) {
		G.Clear(Color.Red);
	}
	hBitmap = Thumbnail.GetHbitmap();
}
Registration
If you compile your class library at this point you should end up with a single DLL. You need to register this DLL using the command-line tool RegAsm.exe that comes with the .NET framework.
Open an elevated command prompt (you need admin rights for this bit) and set the working directory to the output directory of your DLL. Now, invoke the following command:
%windir%\Microsoft.NET\Framework\v2.0.50727\RegAsm /codebase YourThumbnailer.dllThat's half of the battle; the last bit boils down to conventional file associations.
Run the registry editor, and open the HKEY_CLASSES_ROOT key. You will see a list of keys representing file extensions; find one (or create a new one) to match the extension that you wish to attach your thumbnailer to. Under that create a new key named shellex, and under that create another key named {e357fccd-a995-4576-b01f-234630154e96}. Set its (Default) value to {YOUR-GUID-IN-HERE} - yes, the GUID you created earlier. That should look something like this:
- HKEY_CLASSES_ROOT
- .yourextension
- shellex
- {e357fccd-a995-4576-b01f-234630154e96} = {YOUR-GUID-IN-HERE}
- shellex
- .yourextension
That's it!  You may need to log out then in again (and/or reboot and/or just kill all Explorer instances and restart them) for Explorer to catch on if nothing seems to be working.
A final note: IStream to Stream
The only final hitch is that IStream is not the same as our beloved .NET Stream. I use the following snippet to dump all of the contents of an IStream into an array of bytes (which can then be converted to a stream using new MemoryStream(byte[]) if need be).
private byte[] GetStreamContents() {

	if (this.BaseStream == null) return null;

	System.Runtime.InteropServices.ComTypes.STATSTG statData;
	this.BaseStream.Stat(out statData, 1);

	byte[] Result = new byte[statData.cbSize];

	IntPtr P = Marshal.AllocCoTaskMem(Marshal.SizeOf(typeof(UInt64)));
	try {
		this.BaseStream.Read(Result, Result.Length, P);
	} finally {
		Marshal.FreeCoTaskMem(P);
	}
	return Result;
}
This, naturally, is not a good idea if you're thumbnailing very large files, as it dumps the entire thing into memory!
For more information, take a look at MSDN: Thumbnail Providers, which includes useful information (including how to change the overlay icon in the bottom-right of your thumbnails or the adornments).
The COM wrappers and GetStreamContents() snippet are based on this uberdemo article.
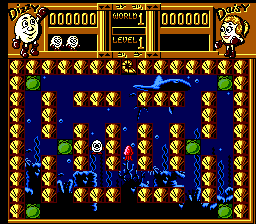
Finally, another screenshot; you can now load IPS patch files directly into Cogwheel using the advanced ROM load dialog - which can be useful for translations.
Sound, at long last.
Friday, 7th March 2008
I have finally got around to adding sound to Cogwheel using Ianier Munoz's waveOut API wrapper.
The technique used is fairly simple. I start with a sound buffer that is a multiple a number of video frames in length (1/60th of a second is one frame) - four seems a good number. This buffer needs to be periodically topped up with sound samples (every four frames in the above example).
I run the emulator for one frame, then generate a frame's worth of audio. I add these samples to a queue. The sound callback then periodically dequeues these samples and appends them to its buffer.
// This is called once every video frame.
// 735 samples at 44100Hz = 1/60th second.
// (Multiplied by two for stereo).
this.Emulator.RunFrame();
short[] Buffer = new short[735 * 2];
this.Emulator.Sound.CreateSamples(Buffer);
this.GeneratedSoundSamples.Enqueue(Buffer);
The important thing is that the sound is always generated after the video frame (and thus after any hardware writes). I log writes to the sound hardware over the period of a frame (along with the number of CPU cycles that have elapsed), then space them out when generating the sound samples so that they play in synch. My previous problems were caused by the sound emulation trying to "look ahead" past what had already been generated.
However, there is a potential problem with this - as the video and sound emulation are not locked in synch with eachother, there are two cases that could crop up:
- The emulator runs faster than 60Hz, generating too many sound samples.
- The emulator runs slower than 60Hz, not generating enough sound samples.
The first is the easiest to deal with. In most instances you'd want a couple of extra frames of sound data left in the queue after topping up the sound buffer, in case in the next period not enough are generated. However, if I notice that the queue is longer than entire sound buffer after topping it up, I clear it completely. This would make the sound a little choppy, but so far this hasn't happened in my tests.
The latter is a little more complex. If I just left it the sound buffer would have gaps in it, causing noticable pops (this I have noticed in some of the more processor-intensive games). To cover up the gaps, I generate enough extra frames of sound data to fill the gap. As no sound hardware writes are made, this has the effect of extending any tones that were currently playing, so the sound will play back slightly out of time. However, slightly out of time by a few 60ths of a second is a better solution than a pop.
// This is called when the sound buffer needs topping up.
// That's about once every four frames.
private void SoundBufferFiller(IntPtr data, int size) {

	// Temporary buffer to store the generated samples.
	short[] Generated = new short[size / 2];

	for (int i = 0; i < Generated.Length; i += 735 * 2) {
		if (this.GeneratedSoundSamples.Count > 0) {
			// We've already queued up some sound samples.
			Array.Copy(this.GeneratedSoundSamples.Dequeue(), 0, Generated, i, 735 * 2);
		} else {
			// Erk, we're out of samples... force generate some more and use those instead.
			// (This avoids popping).
			short[] Temp = new short[735 * 2];
			this.Emulator.Sound.CreateSamples(Temp);
			Array.Copy(Temp, 0, Generated, i, 735 * 2);
		}
	}

	// Copy to the sound buffer.
	Marshal.Copy(Generated, 0, data, size / 2);

	// If too many samples are being generated (FPS > 60Hz) then make sure it doesn't go out of control.
	while (this.GeneratedSoundSamples.Count > this.SoundBufferSizeInFrames) this.GeneratedSoundSamples.Dequeue();

}
Joysticks and Game Genie codes
Monday, 3rd March 2008
The biggest update to the emulator relates to input.
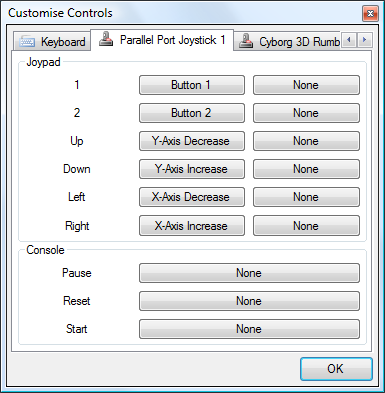
I've added a new control panel that lets you customise key bindings. For the keyboard, you simply click on the button you wish to customise, then press the key on your keyboard you wish to bind. As you can probably tell from the screenshot, I've also added joystick support (via the Multimedia Joystick Functions with a bit of P/Invoke for ease) which means that with a simple adapter and a free driver you can use original SMS pads with the emulator.
I haven't added support for the POV hat, which needs doing as the PPJoy PlayStation controller driver exposes the d-pad as a POV hat.
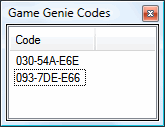
I've also added an interface for adding Game Genie codes. The Game Genie was a cheating device that could be used to patch memory.
I have also started reintroducing (albeit in a slightly buggy fashion) multiple memory devices. Previously I've just been emulating a cartridge ROM and work RAM; the real consoles had multiple memory devices including a card slot, ROM BIOS and expansion slots. By emulating this system one can boot with the original BIOS, and (for example) not insert a cartridge to watch the BIOS animation or play its integrated game.
For ease, there's a quick-load ROM menu option that will load anything into the cartridge slot and disable all others for quick game playing. For those who wish to play with the hardware more, there's an "advanced load" dialog that will let you pick what goes in which slot, and also force various options (such as locale, hardware model, video system and so on) instead of the automatically guessed options. I'd also like it to be able to pick patch files (such as translations) so you don't need to use an external tool. Currently this dialog only supports cartridge ROM and BIOS ROM loading, though.